
![]()
![]()
![]()

Application
Effective noise reduction by using sound level meter
(Comparison of contour maps created by Excel® and OC-1300 series)
This example shows how to reduce noise level simply and effectively without using Sound Intensity Analysis. Sound source or its distribution can be determined by mapping sound pressure level which is measured by sound level meter (or microphone).
The Sound Intensity Analysis has been generally used to reduce noise level effectively, which needs to presume the position of sound source, obtain amount of radiation from sound source and obtain direction of flowing acoustic energy passing through the measuring surface. Since the Sound Intensity Analysis requires a specific sound intensity probe and exclusive software, on-site measurement and analysis have not been easy to perform.
• This example shows the following situation:
Loud noise from a vending machine installed in a conference room makes harmful influence on the working environment in the room. For improvement, sound measurement of the vending machine is performed using the sound level meter and FFT Analyzer to look for the sound source. The measurement results are shown in graphs by the Microsoft® Excel® spreadsheet software and the OC-1300 series graph creating software.
• System Configuration
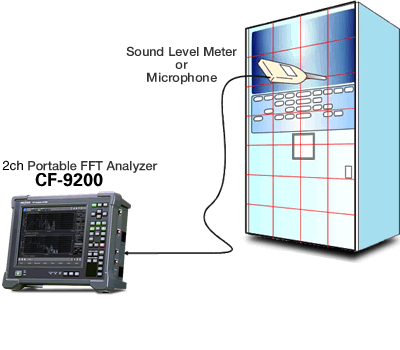
| Model name | Product name | |
|---|---|---|
| 1 | CF-9200 | 2ch Portable FFT Analyze |
| 2 | LA-3560 | Integrating Sound Level Meter |
| 3 | OC-1300 series | Graph creating software |
• Measurement procedure
1.Specify the measurement points in front of the surface of the vending machine (in a reticular pattern at 8(H) x 5 (W), 40 measurement points in total). The clearance of the front surface of the vending machine and the sound level meter is approx. 2 cm, closer as much as possible.
2.Input the AC output of the sound level meter to the FFT Analyzer such as the CF-3600A series and perform averaging each point of power spectrum for five seconds.
Choose the characteristic frequency component having high pressure level from the power spectrum. As Figure.1 shows, the characteristic frequency components to be focused on are 100, 144, 200, 441, 636 Hz and overall value (up to 800 Hz) in this example.
Then write the sound pressure level of each point as a text file.
The following conditions are set in this example.
·Frequency range: 800 Hz
·Window function: Hanning
Setting the frequency range at 800 Hz means that the frequency at 800 Hz or more do not have any characteristic peak and the level is low.
3.As a next step, make a sound pressure contour map for each frequency component using the graph function (contour line) of the Microsoft® Excel® or the OC-1300 series.
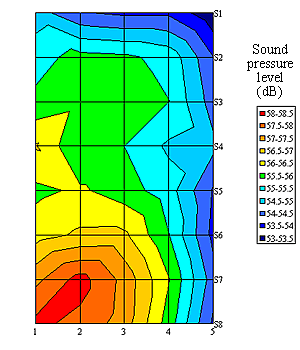
For reference, the overall of sound pressure level up to 800 Hz is listed in the right table.
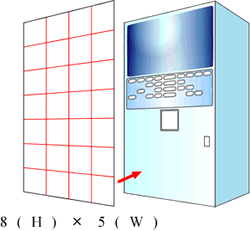
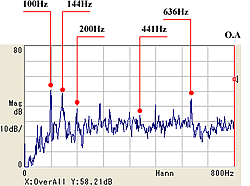
Figure.1 The above data shows the power spectrum having the highest overall value (OVERALL:Y:58.21dB).
| 54.74 | 54.04 | 53.90 | 53.90 | 53.10 |
| 55.29 | 55.69 | 55.59 | 55.35 | 54.02 |
| 55.62 | 55.84 | 55.77 | 55.51 | 54.26 |
| 56.55 | 55.50 | 55.50 | 54.91 | 54.62 |
| 55.88 | 56.08 | 55.73 | 55.23 | 53.95 |
| 56.28 | 56.59 | 56.60 | 55.52 | 53.85 |
| 57.37 | 58.21 | 57.33 | 56.03 | 54.23 |
| 58.14 | 57.84 | 57.27 | 55.77 | 53.90 |
(Unit:dB)
• Examples of analyzing data
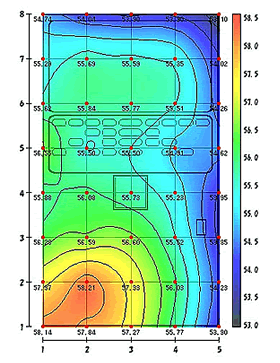
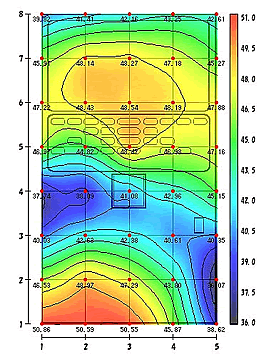
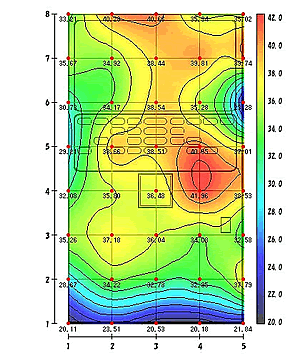
Sound pressure contour map of overall value (up to 800 Hz)
This is the sound pressure contour map of overall sound level (overall up to 800 Hz). This contour map shows that the sound source is at the lower left* area of the vending machine from where the highest sound pressure is produced.
Excel
OC-1300 series
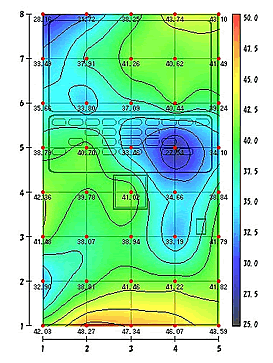
• Sound pressure contour map of 100 Hz
The sound pressure extends radially from the sound source of the lower left* area.
Excel
OC-1300 series
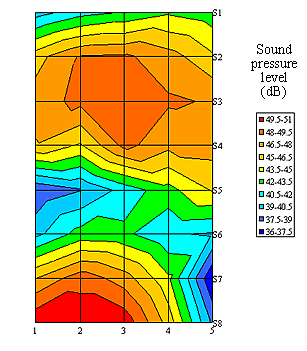
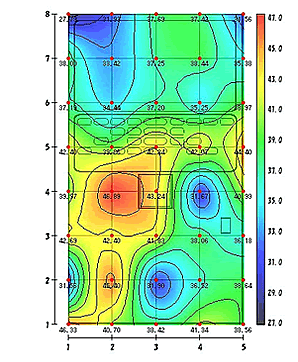
• Sound pressure contour map of 144 Hz
Since the position of sound source is at the lower left* area same as the sound pressure contour map of 100 Hz, you can also see the sound source at the central upper* area. It could be resonance because the area is the position where the vending machine is covered with the acrylic board.
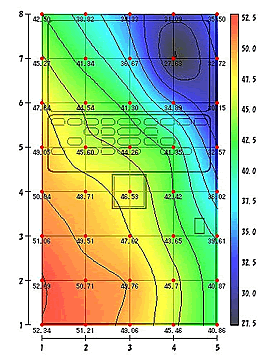
• Sound pressure contour map of 200 Hz
Although you can see sound source at the lower left*, there are also high sound pressure areas in the central left* and the upper right*. The central left* is the position where cold drinks are tumbled out from the vending machine. It is possibly related to the cooling mechanism of the vending machine.
Excel
OC-1300 series
• Sound pressure contour map of 441 Hz
The sound source of the lower left* area is not seen in this sound pressure contour map. The sound source can be seen at the position of a coin slot and seems to have nothing to do with the noise from the inverter. Another countermeasure is required to reduce the noise level.
Excel
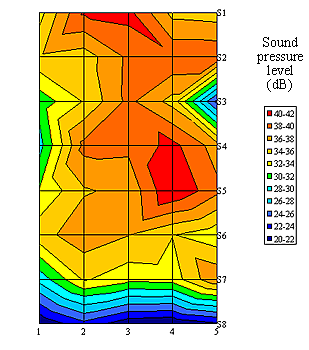
OC-1300 series
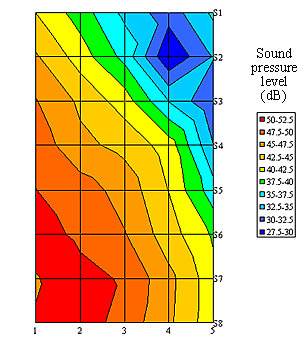
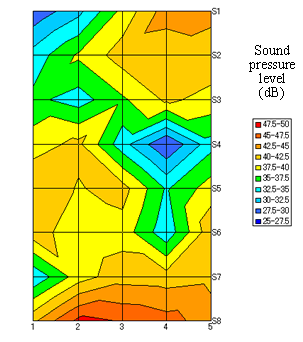
• Sound pressure contour map of 636 Hz
This sound pressure contour map shows sound sources at lower left* and central left*. The central left* is larger sound source. Same as the sound pressure contour map of 200 Hz, it is possibly related to the cooling mechanism of the vending machine.
Excel

OC-1300 series
*When seeing the sound pressure contour map from the front.
• The above contour map of the OC-1300 series is set the transparency level to 40 %.
• The transparency level of contour map can be set from the OC-1300 series Ver. 1.10 or later.
Summary of the main points for successful sound analysis
