VE series

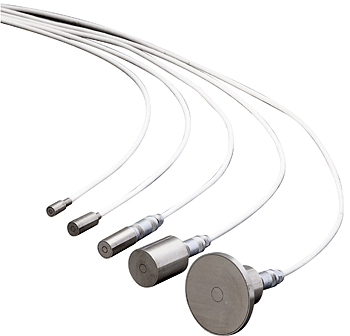
VE series are non-contact type of vibration/small displacement detector with high accuracy which can measure the distance between conductor such as metal and sensor’s surface in micron/submicron resolution. It demonstrates its best performance when used for the measurement and control of the axial and surface vibration of rotational shafts such as main shaft of turbines, electric motors, compressors, and of the thickness and width of moving objects. In addition to the measurement of the amount of displacement, a gap detector can also be used for a wide range of other measurement and control applications such as the measurement of the amount of slack or warping. The non-contact measurement process enables to apply no load to rotational or vibration body, and does not affect the material under measurement.
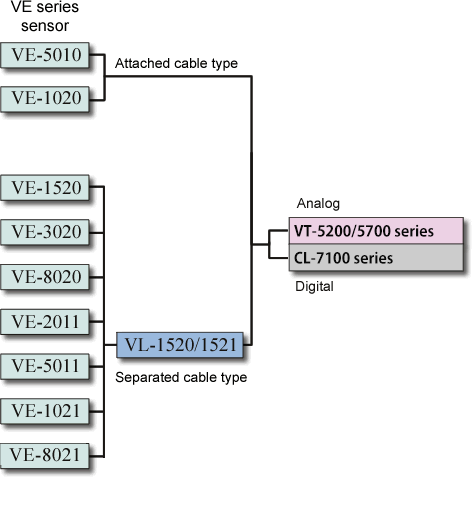
Five models of sensor are available including the VE-8020, which measurement range is 8mm and maximum at VE series. And also, no calibration is required in measurement of any conductive materials even though material change has been made. VE series are used in combination with the electrostatic capacitance-type non-contact displacement meter, VT-5200/5700 series and CL-7100 series.
Features
Examples of measurement


VE series are used in combination with the dedicated converter or electrostatic capacitance-type non-contact displacement meter, VT-5200/5700 series or CL-7100 series. Please be sure that an object can be measured and measurement accuracy depend on the converter or thickness meter. Refer to each product information page in detail.
Electrostatic capacitance-type Gap Detectors VT-5200 series
Electrostatic capacitance-type Gap Detectors VT-5700 series
Non-contact Thickness Meter CL-7100 series
* In order to keep the specified accuracy, the calibration has been performed for one-to-one each other of the sensor with the converter or the display unit before delivery. Recalibration is required if the sensor shall be replaced.
Objects can be measured
If the material of the object to be measured is a conductor, then it can be measured. There are several different types of conductors available as fellows
| Metal plates | Steel, aluminum, stainless steel, etc |
|---|---|
| Silicon Wafers | Can be measured in the same way as metal plates. |
| Copper-foil laminated boards | The thickness of both surfaces can be measured prior to etching. |
| Pastes | Pastes such as battery pole plates prior to firing. |
| Carbon plates | Plates which include a large amount of the carbon material used for gaskets, etc. |
Objects that require care when they are measured
| Alumite | Aluminum plates which have undergone alumite processing have an insulating file on the surface which may cause unstable measurement. |
|---|---|
| Coated objects | Objects coated with an insulating layer include errors in the measured values. |
| Round objects | VE sensors operate on the premise that the object under measurement has a flat surface. If the surface is curved, measurement errors may occur. |
| Object with a rough surface | If the surface is rough, the measured values will be smaller when compared to the values obtained when measurement is performed by a contact-type instrument. This instrument averages out the surface roughness. If the surface is very rough, there may be cases when measurement cannot be performed. |
| Spongy objects | If the object under measurement is spongy, measurement may be smaller due to the open area ratio. |
Measurement of insulators
Gap measurement can be performed when the target measurement object is an insulator such as plastic, sapphire, glass, plastic film and crystal if the insulator measurement function software (model CL-0740) is installed.
Specifications
Standard type
| Model name | VE-5010 | VE-1020 | VE-1520 | VE-3020 | VE-8020 |
|---|---|---|---|---|---|
| Measurement range (μm)*2 | 50 to 500 | 100 to 1000 | 150 to 1500 | 300 to 3000 | 800 to 8000 |
| Minimum diameter of target (mm)*3 | φ6 | φ8 | φ10 | φ20 | φ40 |
| Cable length (m) | 1.5 (attached cable as standard) | 1.5 (VL-1520/1521 as sold separately) *1 | |||
| Operating temperature range *4 | 0 to +80 °C | ||||
Clamp-shape type (common to Φ 10mm)
| Model name | VE-2011 | VE-5011 | VE-1021 | VE-3021 (Discontinued) |
VE-8021 |
|---|---|---|---|---|---|
| Measurement range (μm)*2 | 20 to 200 | 50 to 500 | 100 to 1000 | 300 to 3000 | 800 to 8000 |
| Outer dimensions (mm)*3 | φ3 | φ6 | φ8 | φ20 | φ40 |
| Cable length (m) | 1.5 (VL-1520/1521 as sold separately) *1 | ||||
| Operating temperature range *4 | 0 to +80°C | ||||
Note:
*1: The VL-1520/1521 signal cable is sold separately.
*2: The measurement range refers to the maximum gap
between the surface of the sensor tip and the object
under measurement.
*3: The surface measurement area of the object under
measurement must be larger than the external diameter of
the sensor.
*4: The operating temperature range is the temperature
range in which the sensor can operate, not the operating
range for which accuracy is
guaranteed. The operating range for which
accuracy is guaranteed at 23±2°C. The temperature
characteristics of the VE series are shown in the
formula below.

Revised:2025/12/23
