
Even when the shaft is rotating without load, a numeric value may be indicated on the torque meter owing to the frequency characteristics of the torque detector and meter, and the friction torque of the detector. N-0 compensation enables the accurate measurement by compensating this deviation.
Matching adjustment has been done in time of shipment such as resistance adjustment by using electrical parts. After checking FACTOR (phase difference-torque proportional coefficient), N-0 characteristic and overall accuracy, the certification of test results is attached. In addition, when N-0 compensation is OFF, the accuracy is ± 0.5 % of torque detector rated torque (except for the MD series torque detector). When N−0 compensation is ON, the accuracy is ± 0.2 %.
When the torque detector has mechanical load on its measuring mechanism such as decelerator, the mechanical loss (torque) of it changes depending on the rotation speed. For accurate measurement, measure and compensate the N-0 characteristics in addition to the N-0 characteristics of a torque detector itself. Also, as N−0 characteristics are changed corresponding to type or length of a signal cable, preparation of exclusive cables are necessary.
Measurement method of N-0 characteristics is as follows.
Remove a coupling of the point to set as no load state. If it is only a torque detector, remove the coupling from the detector load side. Then, rotate the detector of the driving side and record the torque display value corresponds to the rotation speed. Measure the N-0 compensation value of each CW/CCW rotation, and set these values to the N-0 compensation function. From this settings, display is compensated to 0 in the no load state regardless of the rotation. Please note that the measurement of rotation speed is necessary by the TS series torque meter. For the operation, please refer to the instruction manual of the TS series.
(Setting example of N−0 compensation)
Measure the N-0 characteristic of CW direction. Prepare the table similar to the following, and record the indicated torque value at each rotation speed by rotating the detection axis with a motor in the state of no load.
Caution
Write the displayed numbers rounding down decimal places in the count section as well as zero value. Rotation speeds are also displayed numbers rounding down decimal places.
| Rotation speed (r/min) | 0 | 500 | 1000 | 2000 | 3000 | 4000 | 5000 | 6000 |
|---|---|---|---|---|---|---|---|---|
| Count | -10 | 0 | 5 | 0 | -5 | -5 | -5 |
(Note) When torque display value is 34.56 Nm, the count is 3456. |
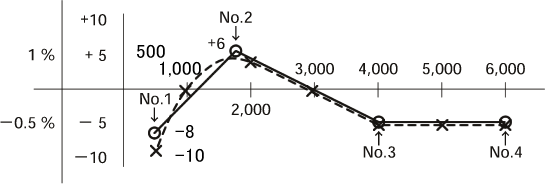
Then, draw the figure with rotation speed in horizontal axis and count value in vertical axis and decide the compensation point.

| Point | No. 1 | No. 2 | No. 3 | No. 4 |
|---|---|---|---|---|
| Rotation speed(r/min)) | 500 | 1800 | 4000 | 6000 |
| Compensation value | -8 | +6 | -5 | -5 |
The frequency characteristics are assumed to be as shown in the dotted line of the figure (---). No. 1 to 4 selections are available with the linear approximation of 4 compensation points. In the case of above figure, finer compensation is available by taking a detailed data of around 2000 r/min which has large changes.
Compensation points are maximum 5 points in the TS-2700 Digital Torque Meter, and maximum 10 points in the TS-3200 Digital Torque Meter. In addition, there are some models that have no N−0 compensation function, so please check it with the instruction manuals.
Revised:2011/08/02