
![]()
![]()
![]()


General measurement method is as follows.
1. Measurement
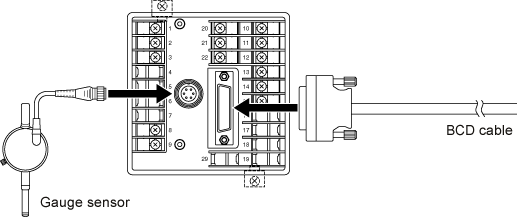
(1) Connects to the peripheral device.
(2) Turn on the power. The DG-4280 operates immediately.
(3) Check the value shown on the display of the front panel is changed by moving the gauge sensor spindle.
(4) Move the gauge sensor spindle to the position where you want to be set as a zero point and fixed the spindle.
(5) Reset the measurement value to zero at the zero point using any of the following methods;
• Press the RESET switch on the front panel.
• Short-circuit between the RESET input terminal (No. 21) and the COM terminal (No. 22) on the rear panel.
• Input a low level voltage signal to the RESET input (Pin 32) of the BCD OUT connector on the rear panel.
(6) Input pass-fail decision value of the front panel to the preset switch.
(7) Start the measurement. The pass-fail decision is made at the same time as the movement amount of the gauge sensor spindle is shown on the display.
2. Hold the measurement value
It is possible to hold the measurement value on the display and the BCD output. The following two methods are available;
• Short-circuit between the HOLD input terminal (No.20) and the COM terminal (No. 22) on the rear panel.
• Input a low level voltage signal to the HOLD input (Pin 31) of the BCD OUT connector on the rear panel.
3. Stop the pass-fail decision output
When the PRESET GATE signal is input in the following method, the pass-fail decision is forcedly stopped and the decision result output turned OFF.
• Short-circuit between the input terminals for the terminal block PRESET GATE 1 to 4 (No.5 to 8) and the COM terminal (No. 9).
4. Cancel the error message
When miscounting occurs in the counting circuit of the DG-4280, the display on the front panel flashes and the error output (Pin 30) of the BCD OUT connector turns ON. The error can be cancelled with the following method of zero reset.
• Press the RESET switch on the front panel.
• Short-circuit between the RESET input terminal (No. 21) and the COM terminal (No. 22) on the rear panel.
• Input a low level voltage signal to the RESET input (Pin 32) of the BCD OUT connector on the rear panel.
For further information, please refer to the "Trouble
shooting-Flashing of the display".
Revised:2000/12/08
