![]()
![]()
![]()


Operation procedure
A. Operation for Sound Level Meter1. Input the analog signal of the Sound Level Meter to the DS-0221, and set the level range (in here, select 90 dB) of the sound level meter to be measured.
2. Set the frequency weighting characteristic of the sound level meter to C characteristic.
3. Press the CAL button of the Sound Level Meter. The internal calibration signal is outputted from the Sound Level Meter. Generally, the CAL signal of the Sound Level Meter is frequency of 1 kHz. The signal of -6 dB from the upper limit of the setting level range is displayed. In here, the level range of the Sound Level Meter is set as 90 dB, so -6 dB of it is 84 dB. 84 dB will be displayed.
B. Operation for DS-0221
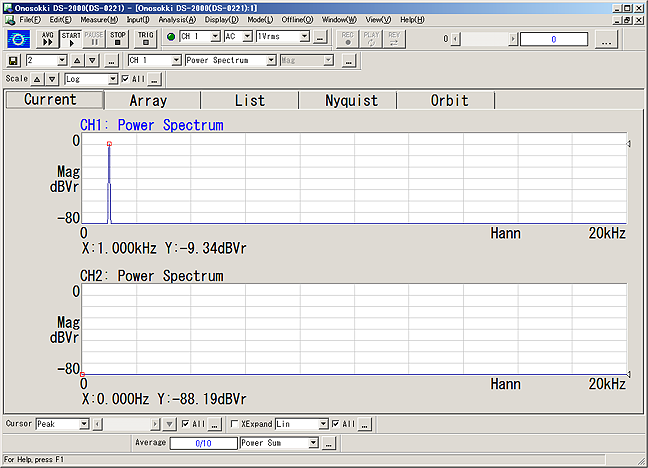
1. Click [START] to start the measurement.
2. Set frequency range (20 kHz) and voltage range (1 Vr). The spectrum (1 kHz) of the CAL signal of the Sound Level Meter is measured and displayed.
|
Unit calibration
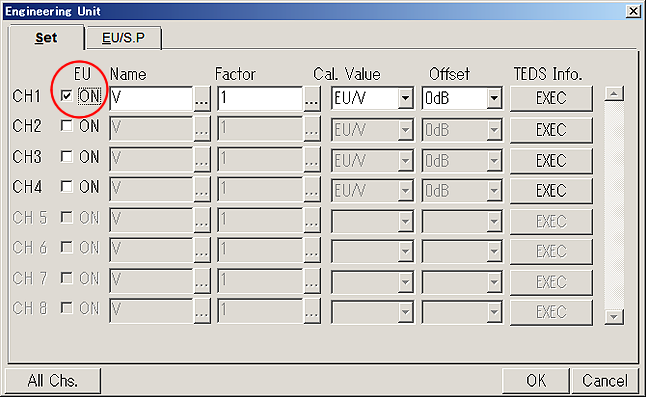
Select [Input] > [Unit calibration] to open the unit calibration dialog and put check mark to [Calibration].
|
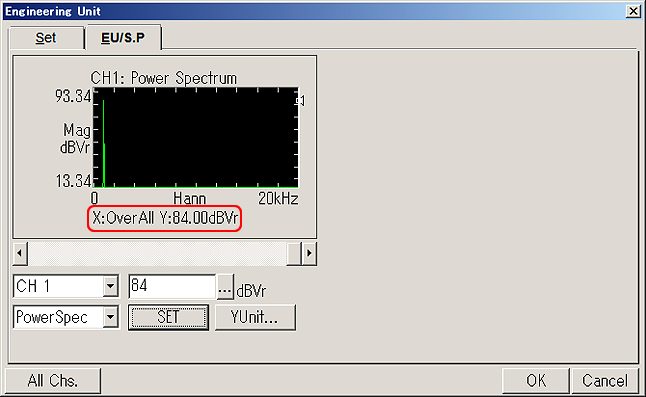
Click the [EU/S.P] tab of the dialog to open the [EU/S.P] dialog.
1. Set the cursor in the window to X axis OVERALL.
2. Use the keyboard to enter [84] dB and click [Setting] button. Calibrate the overall value to be 84 dB.
|
3. Check that the display has been changed to [X: OverAll Y: 84 dBVr]
4. Click [OK] to confirm the setting and close the dialog.
|
Set the cursor to [Search] and move it to Overall in the measurement screen, and confirm that the result is shown as [X: Overall, Y: 84.0 dB]. The calibration is complete.
|
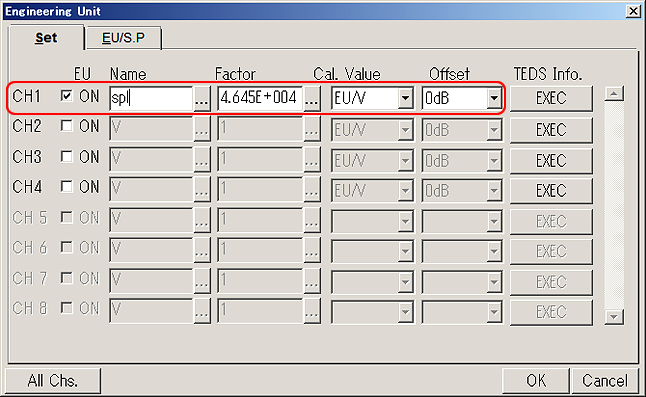
Select [Input] > [Unit calibration] to open the [Unit calibration] dialog.
-1. The correction value is automatically calculated as [Physical value 4.358E + 004 EU/V] and inputted.
-2. Input the unit name as [Unit name: SPL (Sound Pressure Level)].
|
Remarks
After the unit calibration, if you change the range of the Sound Level Meter from 90 dB to 80 dB, it is possible to make simple correction by setting the [Offset: -10 dB] in the [Unit calibration] dialog. However, you might forget that the setting is remembered in the next measurement, so we recommend you to calibrate after changing the range of the Sound Level Meter.
Press [CAL] button of the Sound Level Meter and return to the measurement state.
Set the frequency characteristics (A, C or FLAT) and time weighting characteristics (FAST or SLOW). Note that the AC output signal from the Sound Level Meter is the signal which is corrected by the frequency characteristic in general.
Process the noise analysis by the DS-0221.
Remarks
The FFT analysis of the DS-0221 is not same as the signal processing of the Sound Level Meter, so, the display value of the Sound Level Meter and the overall value of the FFT analyzer do not match in the analysis which has extreme change in noise.
Revised:2009.04.20