
![]()
![]()
![]()


This function starts measurement from the value which presets in advance and set it in a display. Maximum set value is 69.99 (or 69.999 mm).
For example, when measuring a part with a size of around 50 mm ± 10 mm, set a reference point to 50 mm block gauge and set the preset value to 50.00. When you measure the part after setting the preset value, the measurement value is displayed in the range of 40 mm to 60 mm.
Measurement method
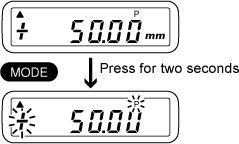
<1> Switch to the preset function
When the power is switched on, the display is in the normal measurement function. The direction switch +/- cannot be selected in the preset measurement function. Select the counting direction under the normal measurement function condition.
When the mode switch is pressed and held for around two seconds in the normal measurement function, "P" mark is appears in the display to indicate that the preset function has been selected. At that time, the selected value will be displayed (or "0.00" will be displayed if the value is not been set).
It is possible to process the measurement combined with MAX/MIN/R measurement mode.
<2> Return to the normal measurement function
To return to the normal measurement function, press and hold the reset switch for around two seconds and release it. The "P" mark will disappear and the "0.00" will be shown in the display.
<3> Switch operation during the preset measurement
RESET :
○ Press the switch briefly and release.
At the time of press and release the switch, the current spindle
position is set as the preset value (selected value) and displayed.
It is possible to process the measurement combined with MAX/MIN/R
measurement mode. The initial value is as follows.
| Mode | Initial value (display value) |
|---|---|
| R | 0.00 |
| MAX/MIN | Preset value |
● Press the switch and hold for around two seconds. To return to the normal measurement function.
MODE :
○ Press the switch briefly and release.
The display will change in the following sequence: Normal mode → MAX
mode → MIN mode → R mode → Normal mode
Select the measurement mode and start measurement. When you press the RESET switch, you can return to the initial value.
● Press the switch and hold for around two seconds. A flashing "P" mark appears and the display changes into the input screen of the preset value.
POWER :
To turned the power off. When the power is turned on again, the
display is changed into the normal measurement function.
<4> Setup method of preset value
1. Switching to the preset setup display
The "mm" disappears and a flashing polarity (+ or -) appears in the display, returns to the preset setup display.
2. Selecting the number value
The MODE switch is used for the setup operation.
MODE :
○ Press the switch briefly and release.
Select the polarity and the value. The flashing point will be
changed from the polarity +- to the digits number value by
pressing the switch. It is possible to enter the setup value
where the digit is flashing.
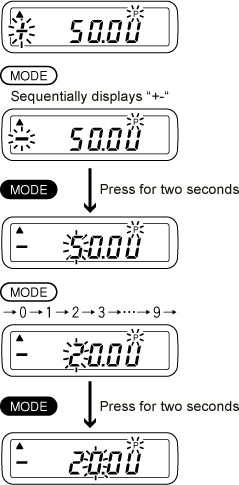
● Press the switch and hold for around two seconds.
<1> When the polarity (+-) is flashing, the display of "+" and "-" will be changed sequentially by pressing the MODE switch. When the polarity to be set is appeared, press and hold the MODE switch for two seconds until the flashing point of the display moves from polarity digit to the number digit, then release the switch.
<2> When the number is flashing, the display of the value will be changed sequentially as 1→2→3→4→5• • 0 (maximum digit is 6) by pressing the MODE switch. When the value to be set is appeared, press and hold the MODE switch for around two seconds until the next digit starts flashing.
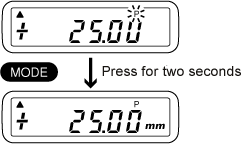
<3>After the value at the last digit is set and the MODE switch is pressed and held at around two seconds, only the "P" mark flashing. Press again or keep pressing the switch, and release it when the "mm" is displayed. Setup operation is finished and the setup value is stored.
The display is returned to the preset function, so press the RESET switch to confirm the display of the preset value and start the measurement.
<4> If you want to cancel the setup in the middle, press the RESET switch and return to the preset measurement function.
<5> The preset value is stored in memory even though the power is switched OFF. However, if a system reset is performed, the preset value becomes the initial value of 0.00 (or 0.000).
Revised:2001/01/12
