
![]()
![]()
![]()


1.Switch to the menu mode
Press the panel switch [MENU], and display the main menu.
2. Select the date and time settings (1.DATE SET)
The items which are in standby states are displayed with flashing. Press the panel switch [<] or [>] (ADDRESS) to flash [1.DATE SET]. And press the panel switch [ENTER] to select the date setting.
3. Date setting (year/month/day)
Press the panel switch [<] or [>] (ADDRESS) to flash [1.DATA1], and press the panel switch [ENTER]. After checking the setting item "year" is flashed, switch the year by pressing the panel switch [<] or [>] (ADDRESS).
Next, set the month. Press the panel switch [<] or [>] (ADDRESS) to move the flashing to the setting item "month ". Press the panel switch [<] or [>] (ADDRESS) to switch the "month". Continuously, set the date. Press the panel switch [<] or [>] (ADDRESS) to move the flashing to the setting item "date ". Press the panel switch [<] or [>] (ADDRESS) to switch the "date". In the end, press the panel switch [ENTER] to complete the year/month/day adjustments.

4. Time setting (time: minute: second)
Press the panel switch [<] or [>] (ADDRESS) to flash [2.DATA2] and press [ENTER]. First, set the hour. After checking the setting item "hour" is flashed, press the panel switch [<] or [>] (ADDRESS) to switch the hour. Next, set the minute. Press the panel switch [<] or [>] (ADDRESS) to move the flashing to the setting item "minute ". Press the panel switch [<] or [>] (ADDRESS) to switch the minute. Continuously, set the second.
Press the panel switch [<] or [>] (ADDRESS) to move the flashing to the setting item "second ". Switch the second by pressing the panel switch [<] or [>] (ADDRESS). In the end, press the panel switch [ENTER] to complete the hour/minute/second adjustments.
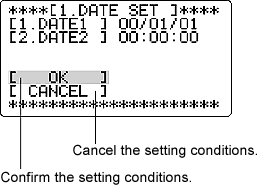
5. Complete the date and time settings
To confirm the adjusted date and time, press the panel switch [<] or [>] (ADDRESS) to flash [OK] and press the panel switch [ENTER]. At this time, if the panel switch [MENU] is pressed, the display is directly changed to the measurement screen after the confirmation of the date and time settings.
Revised:2002/04/12
