
![]()
![]()
![]()


1. Assembling measurement auxiliary tools
To aid measuring, a wind screen (attached), a tripod (LA-0203C: sold separately), a microphone extension cable (5m to 100m: AG-2010/2030/2050/2100 or 3301/3302/3303/3304/3305), and an all-weather wind screen (LA-0207) are available. Use or purchase these tools according to the application or purpose.
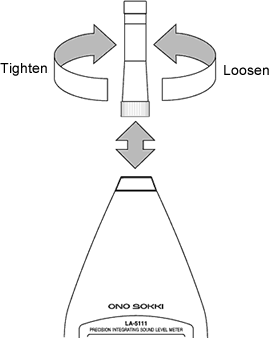
2. How to remove and install a preamplifier
To tighten the preamplifier by turning the preamplifier fixing screw clockwise viewed from the front after turning off the power. To loosen the screw, turn the screw anticlockwise. Remove or install the preamplifier by engaging with the connector of the main unit slowly and gently.
Note
Always turn off the power before removing or installing the preamplifier. The preamplifier is precision equipment with built-in condenser microphone. The preamplifier must be handled with utmost care. Make sure that no impact (such as dropping) is applied to the preamplifier after removal.
3. How to use the wind screen
A wind screen is attached to reduce measuring errors such as those due to strong wind. Use the wind screen for measurement of a ventilating fan or measurement performed outdoors where the microphone is exposed to direct strong wind. Insert the wind screen slowly and gently into the hole for the wind screen until the end of the microphone makes contact after turning off the power of the sound level meter. When using a wind screen outdoors continuously for a long period of time, please purchase an all-weather wind screen that is sold separately.
Note
Make sure that no impact is applied to the microphone when removing or installing a wind screen.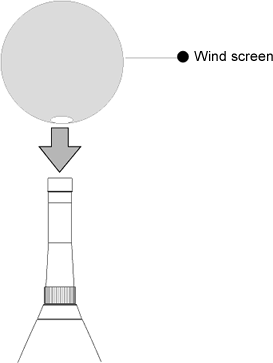
4. How to use a tripod and an extension cable
To attach a tripod directly on the sound level meter main unit, mount the tripod with the tripod attachment screws that are provided at the rear of the main unit.
The screws at the bottom of the sound level meter are for a camera tripod. They are nominal "1/4" screws that comply with JIS B7103. (Screws for the sound level meter are female screws.)

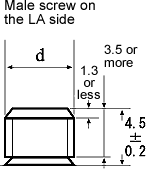
| Unit : mm | |||||||||
| Nominal | Number of screw threads (n) (per 25.4mm) |
Pitch | Male screw | Female screw | |||||
|---|---|---|---|---|---|---|---|---|---|
| 1/4 | 20 | 1.270 | Outer diameter (d) | Effective diameter | Core diameter | Core diameter(D) | Effective diameter | Inner diameter | |
| Reference size | 6.350 | 5.525 | 4.975 | 6.350 | 5.525 | 4.975 | |||
| Maximum permissible size | 6.322 | 5.497 | 4.763 | Not regulated | 5.820 | 5.267 | |||
| Minimum permissible size | 6.012 | 5.355 | Not regulated | 6.460 | 5.635 | 4.975 | |||
| Allowance | 0.310 | 0.142 | --- | --- | 0.185 | 0.292 | |||
When further reduction of analysis effect of the sound level meter main unit and the acoustic effect from the measurer is necessary, it is recommended to use a tripod (LA-0203) and a microphone extension cable (AG-2010/2030/2050/2100 or AG-3301 to 3305, AG3401 to 3405) that are sold separately. By using the tripod and the extension cable, the microphone and the preamplifier can be installed keeping a sufficient distance from the sound level meter main unit, thereby preventing external impacts that are the causes of errors at precision measurement. Use the following procedure to assemble the tripod and the extension cable.
Note
The microphone holder is included in the extension cable.
Operation
1. Turn off the power of the sound level meter
2. Attach the microphone holder to the tripod.
3. Remove the preamplifier from the sound level meter.
4. Connect the sound level meter main unit and the preamplifier with the extension cable.
5. Mount the preamplifier in the microphone holder of the tripod.
Note
Make sure that the tripod does not fall over during the measurement.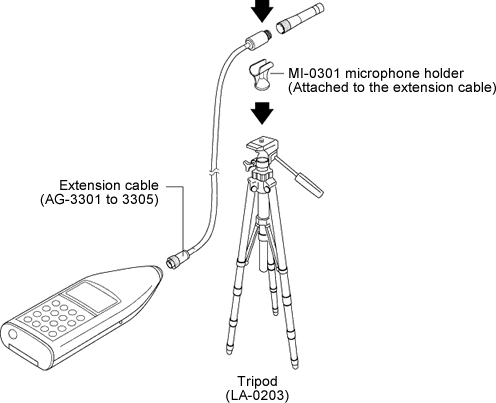
• AG-2010/2030/2050/2100 Microphone extension cable
• AG-3301/3302/3303/3304/3305 Microphone extension cable
• LA, MI Series tripod specification (LA-0203C)
Outer dimensions of other cables
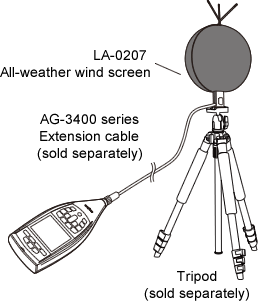
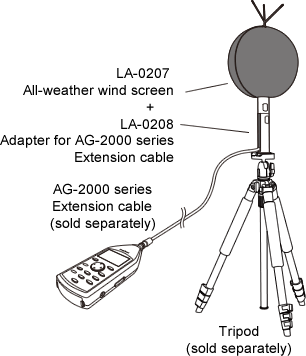
5. How to use the all-weather windscreen
It is recommended to use the all-weather windscreen (LA-207) when carrying out outdoor measurement during bad weather such as in snow or rain. (Conforming to JIS C 1509-1 : 2005, IEC 61672-1 : 2002 with batteries installed.)
See below for the procedure for assembling the all-weather windscreen. When using the all-weather windscreen, purchase the extension cable (AG-2000/33003400 Series) also.
Operation
1. Turn off the power supply.
2. Attach the microphone holder to the post.
3. Remove the preamplifier from the sound level meter.
4. Connect the sound level meter main unit and the preamplifier with the extension cable.
5.After mounting the sleep section of the all-weather wind screen on the preamplifier, attach the screen on the sleep section in which the preamplifier is mounted.
6. Attach the screen on the microphone holder that is mounted on the post.
Attention
Consumable supply (Wind screen, waterproof mesh) is required periodically to be replaced.Revised:2004.11.15
