![]()
![]()
![]()


To minimize error of measured values, we recommend you to calibrate the sound level meter periodically. Calibration of the sound level meter can be made by using either the built-in transmitter or optional sound calibrator (SC-3100).
1. Calibration procedure with the built-in transmitter
This calibration method is an electrical calibration method based on the steady microphone sensitivity. When the internal calibration signal is turned on with the level range setting of 30 to 90 dB, a calibration signal (with a frequency of 1 kHz) is outputted from the output terminal. This calibration signal agrees with -6 dB under the full scale of each level range. (For wide range, it agrees with -16 dB under the full scale.) The output calibration signal can be used as a level calibration signal for each instrument connected to the sound level meter.
◆Operating procedure
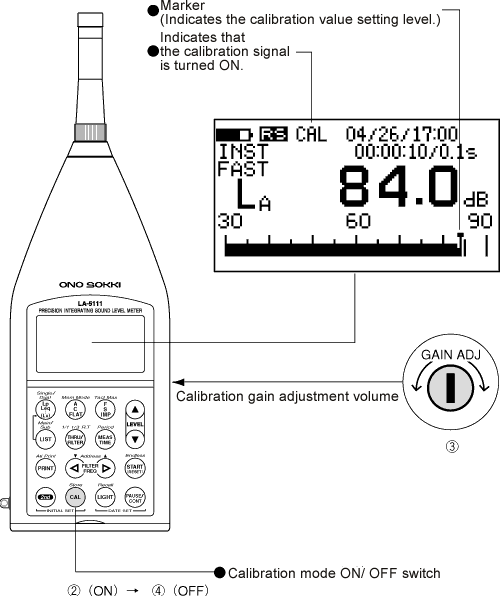
1. Set measurement condition of the sound level meter for calibration.
Measurement mode: INST (Panel switch [Tact Max])
Measurement range: Reference range (30 to 90 dB) (Level range switch [△·▽]).
2. Turn ON the calibration signal.
When you press the panel switch [CAL], the calibration signal is turned ON and marker is moved to the calibration value setting position.
3. Adjust the display value to 84.0 dB.
Turn the gain adjustment volume for calibration with an accessory adjustment screw driver to set the display value to 84.0 dB by using the marker position on the bar indicator as a reference. Do not turn or push in the gain adjustment volume for calibration with excessive force. It may become a cause of the failure.
4. Turn the calibration signal OFF.
Upon completion of calibration, press the [CAL] switch again to turn off the calibration signal.
|
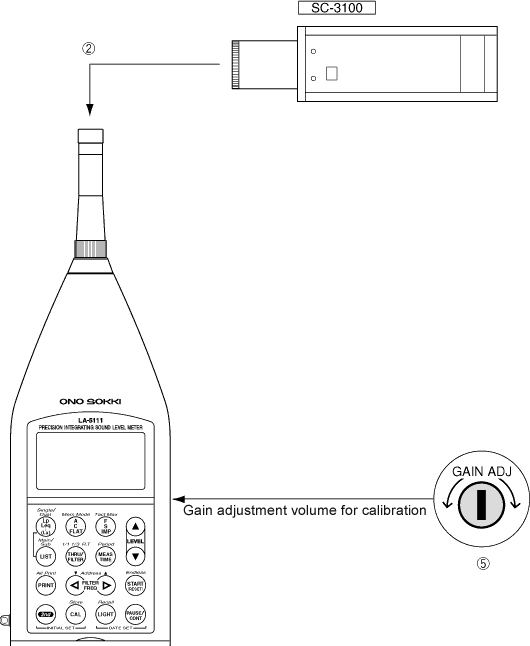
2. Calibration procedure with optional sound calibrator
This calibration method is based on the sound characteristics of a sound calibrator. To perform the calibration with the sound calibrator, optional sound calibrator (SC-3100 Sound Calibrator) is required.
◆Operation procedure
1. Set measurement conditions of the sound level meter for calibration as follows.
Display screen: Standard screen (Panel switch [LIST])
Display: LP display (Panel switch [LP/Leq…])
Frequency correction: FLAT is displayed P (Panel switch [A/C/FLAT])
Measurement mode: INST (Panel switch [TACT Max])
SC-3100: Calibration frequency 250 Hz (Representative value)
Sound pressure level 124 dB (Representative value)
2. Set the microphone of the sound level meter to the sound calibrator. Insert the microphone into the insertion slot of the sound calibrator.
3. Turn ON the power of the sound calibrator.
4. Set the measurement range to the maximum value which does not exceed full scale of the calibration level.
5. Set the calibration value to the calibration reference sound pressure level. Turn the gain adjustment volume for calibration with an accessory adjustment screw driver to set the calibration value matches the reference calibration sound pressure level of the sound calibrator. Do not turn or push in the gain adjustment volume for calibration with excessive force. It may become a cause of the failure.
<Note>
Every sound calibrator has its own calibration reference sound pressure level. Before starting calibration, check the calibration reference sound pressure level of the sound calibrator to be used, by referencing the test certificate comes with the calibrator.
|
3. Contract calibration
Calibration (charged) must be done in our factory. After calibration, we will send you the certificate of test result. Also, we will send you the traceability chart (charged), and the certificate of calibration (charged) upon your request.
4. Test certificate *Test certificate is valid only in Japan
After inspection of the unit in our factory, we are commissioned to offer the public institution to operate inspection. Test certificate is operated based on Measurement Act and a sticker which mentioned valid period (5 years) will be attached.
Revised:2001.10.12