![]()
![]()
![]()


1. Overview of dual mode measurement
The dual mode calculation is a function to simultaneously measure the sound with individual setting conditions of main (M) and sub (S). There is no percentile sound pressure level measurement function in the sub mode, but following values such as equivalent continuous A-weighted sound pressure level or single event sound exposure level can be simultaneously measured with individual setting conditions.
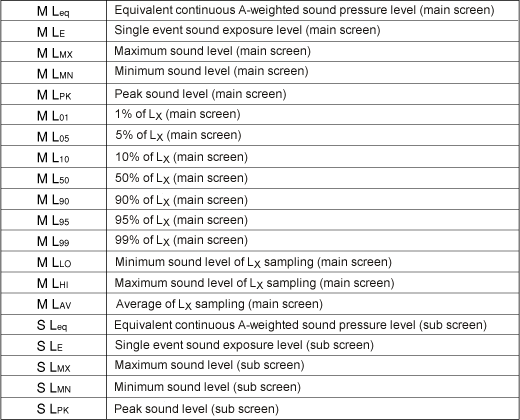
List of measurement value of dual mode
By measuring the percentile sound pressure level by dual mode, the following values can be simultaneously obtained.
|
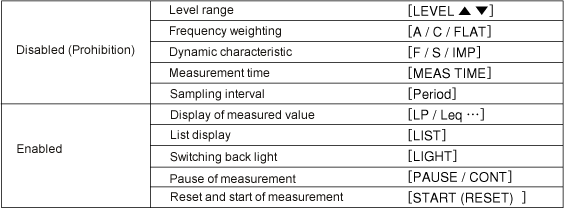
List of limitations while measuring/ pausing.
Some of the panel switches cannot be operated as follows while measuring or pausing the dual mode calculation. Note that when the power is turned off while measuring dual mode calculation, the measurement is forcibly stopped.
|
Signal output
The signal displayed on the main screen (M) is outputted from the DC/AC signal output terminal of the sound level meter.
2. Switching to the dual mode
Press the panel switch of secondary function [Single/Dual] to switch the mode from the normal percentile sound pressure level measurement to dual mode.
<Notes>
When the wide range mode is set, switching to the dual mode is not possible. Before switching to the dual mode, be sure to set a mode other than the wide range mode.
|
3. Switching between main and sub screens
The dual mode has the main and sub measurement screens. Press the panel switch of the secondary function [Main/Sub] switch to switch between the main (M) and sub (S) screens.
4. Measurement procedure by dual mode
◆Operating procedure
1. Activate the dual mode.
Press the panel switch of secondary function [Single/ Dual] to activate the dual mode.
2. Set the frequency weighting and dynamic characteristic for the main screen (M).
Press the panel switch of secondary function [Main/Sub] to enable the main screen and then set the frequency weighting and dynamic characteristic as follows;
Frequency weighting: Arbitrary (panel switch [A/C/FLAT])
Dynamic characteristic: Arbitrary (panel switch [F/S/IMP])
3. In the same manner,
press the panel switch of secondary function [Main/Sub] to enable the sub screen and then set the frequency weighting and dynamic characteristic as follows:
Frequency weighting: Arbitrary (panel switch [A/C/FLAT])
Dynamic characteristic: Arbitrary (panel switch [F/S/IMP])
4. Set the measurement conditions common to the main and sub screens.
Display screen: Arbitrary (Panel switch [LIST])
Level range: Arbitrary (Panel switch [LEVEL▲▼])
Measurement value: Arbitrary (Panel switch [Lp/Leq…])
5. Set the measurement time.
Press the panel switch [MEAS TIME] to set measurement time. To set to FREE, set the setting time to 00:00:00. When you set to FREE, the measurement is continuously processed maximum 100 hours (99:59:60) until you press the panel switch [PAUSE/CONT] . The measurement time cannot be set to 100 hours or more.
6. Set the Lx sampling interval.
Press the panel switch of the secondary function [Period] to set the sampling interval. When sampling interval is set to 10 ms, overflow may occur if the measurement time is long. Therefore, set the measurement time to one hour or less. The overflow time when the measurement values are changed periodically is shown in the table below. Set the appropriate sampling interval and measurement time by referring the following table.
|
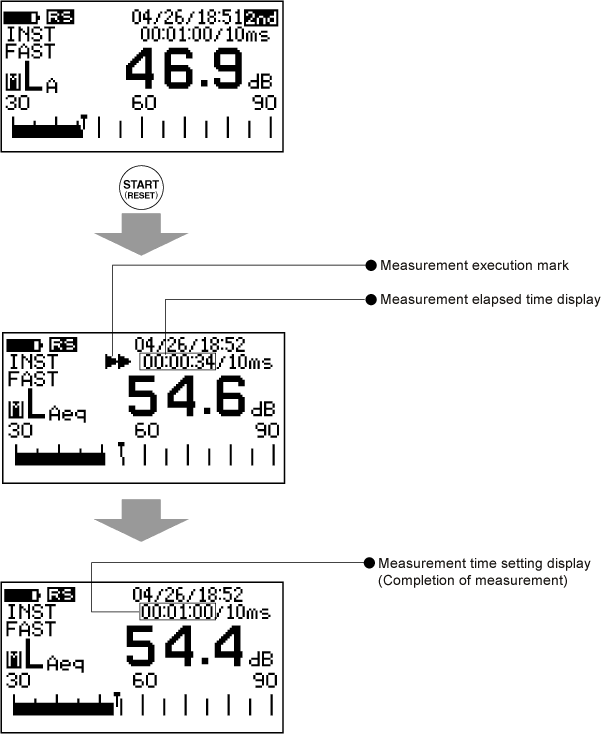
7. Start measurement.
Press the panel switch [START] to start measurement. The measurement execution mark is appeared while measuring, and measurement elapsed time is displayed in the measurement time setting screen.
8. Read the measured value on the digital display.
When the setting measurement time is elapsed, the measurement is finished and the measurement execution mark is disappeared.
<Notes>
When the [START] is pressed again while measuring, the measured data is cleared and new measurement is started. If the over level or under level warning is displayed while measuring, the displayed data are not reliable. The over or under level warning remains on the screen until the next measurement is started. If the over level warning is displayed, set a new level range and then start measurement again.
|
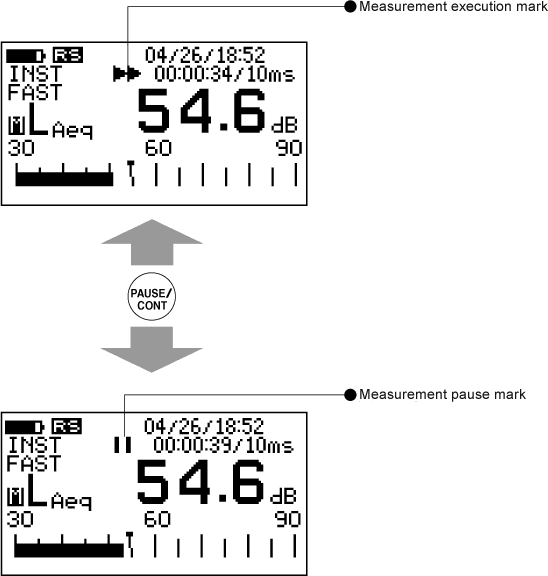
Pause of the measurement
Press the panel switch [PAUSE/CONT] to pause the measurement. The measurement execution mark is changed to the pause mark. When the panel switch [PAUSE/CONT] is pressed again, the measurement is restarted.
|
5. Reading measured value
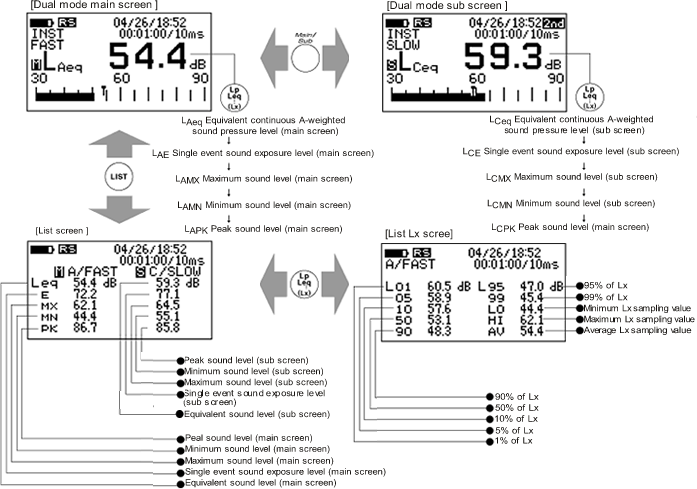
The measured value can be displayed in the following procedure. The percentile sound pressure level, equivalent continuous A-weighted sound pressure level, single event sound exposure level, maximum sound level, minimum sound level and peak value are displayed in here.
Displaying measured values using panel switch
Every time you press the panel switch [Lp, Leq…] while the main or sub measurement screen is displayed, measured value of main or sub is displayed in the following order; Instantaneous value > equivalent continuous A-weighted sound pressure level > Single event sound exposure level > Maximum sound level > Minimum sound level > Maximum value without leveling > Instantaneous value > …
Displaying measured values in list display
Every time you press the panel switch [LIST] while the main or sub measurement screen is displayed, measured value of equivalent continuous A-weighted sound pressure level, single event sound exposure level, maximum value, minimum value and maximum value without leveling are displayed. In addition, when panel switch [Lp/Leq…] is pressed, all the Lx values are listed.
|
Revised:2001.10.12