
![]()
![]()
![]()


The AA-6100/6101 Air Lifter is applicable only for the GS-1513, 1513A, 1530, 1530A, 1613, 1613A, 1630 and 1630A.
Applicable linear gauge
| Air lifter model name | Applicable linear gauge sensor |
|---|---|
| AA-6100 | GS-1513A (discontinued), GS-1613A (discontinued), GS-1513 (discontinued), GS-1613 (discontinued) |
| AA-6101 | GS-1513A (discontinued), GS-1613A (discontinued), GS-1530 (discontinues), GS-1630 (discontinued) |
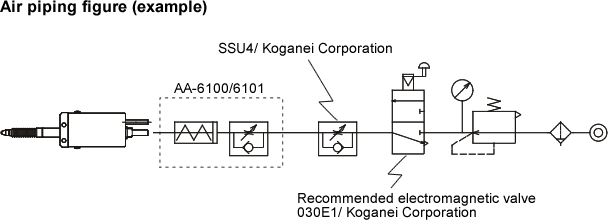
Air piping figure
The basic air piping method is as follows. Please prepare the parts by yourself apart from the AA-6100/6101.
Mounting Method
The mounting method of the air lifter to the GS sensor is as follows.
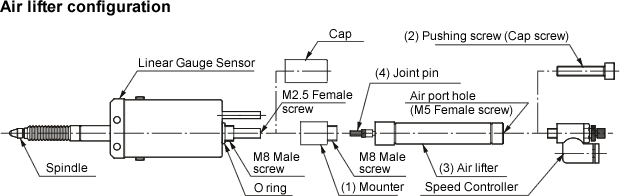
* Please be careful to the excessive tightening of the screw part when using the tool.
* Please use the glue to the screw part to prevent the screw from loosening.
1. Remove the cap of the Linear Gauge Sensor. Do not remove the O ring from inside of the cap and place it to the sensor side.
Things to be aware of when operating
1. Air supplying condition
Please control the spindle movement velocity with the speed controller. When the velocity is too fast, the target measurement object will be damaged. Also, if the spindle velocity exceeds the maximum response specified for the GS sensor, the counter shows the error display. (Digital display will be flashed.)
Use the air filter to supply the clean air.
2. Other
To control the spindle returning velocity, mount the exhaust throttle valve (SSU4/made by Koganei Corporation) as close as possible to the speed controller.
Prevent the hole which is in the middle of the air lifter from water or oil splash. (Air lifter is not conformed to the IP64.)
If you use huge amount of glue to prevent the screw from loosening, it might occur a movement error caused by the invasion of the glue into the bearing. Please be careful with the quantity and place to apply the glue.
Because of the structure of the air cylinder, when you stop to use the gauge sensor for a long time or leave it in the cold environment, the response might goes bad after turning the electromagnetic valve ON. Moreover, when the sensor starts moving, there is a possibility that the spindle will be jump out or the velocity will become out of control, so please do the test operation before the measurement.
Feature
| Movement range | AA-6100 : 0 to 13 mm AA-6101 : 0 to 30 mm |
|---|---|
| Using fluid | Air |
| Using pressure | 0.25 to 0.7 MPa |
| Guaranteed pressure resistance | 0.9 MPa |
| Operating temperature range | 0 to +40 °C |
| Storage temperature range | -10 to +55 °C |
| Weight | AA-6100 : 40 g AA-6101 : 50 g Including the speed controller |
| Life time | 5 million times |
| Accessory | Mounter, Speed Controller (AA4-M5B made by Koganei Corporation) and pushing screw |
Revised:2001.01.12
