
![]()
![]()
![]()


You need to set initial values of the FP series Fuel Flow Detector as follows before you use the FM series for the first time. You also need to set initial values in the case of using another FP series Fuel Flow Detector.
How to set the initial values to the FM-2500 Digital Flow Meter when using it with the FP-2240HA Fuel Flow Detector
Notes
|
1. Set the date and time. (If it is already set, go to (2)) → Setting procedure for the date and time is here.
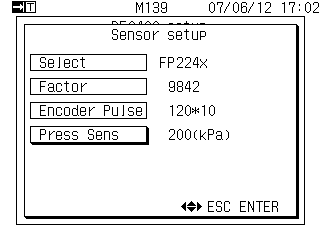
2. Set the detector model, factor value, encoder pulse and pressure sensor in this order.
Operating procedure
1. Push ![]() (MENU) key. The following Menu setup screen appears.
(MENU) key. The following Menu setup screen appears.
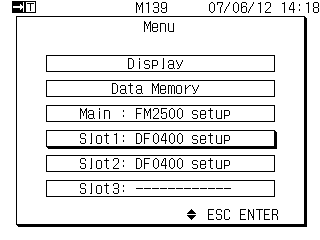
>>Select the slot to use.
If you use more than one slot, you need to set for each slot.
Use ![]() or
or ![]() and select
and select
![]()
then push ![]() ,
and the following setup menu appears.
,
and the following setup menu appears.
2. DF-0400 setup menu appears.
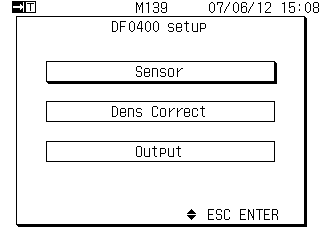
Use ![]() or
or ![]() and select
and select
![]()
then push ![]() .
.
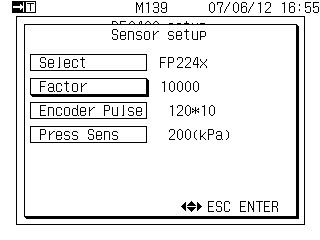
3. Sensor setup menu appears.
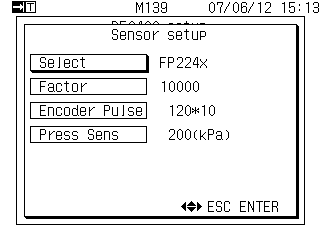
When the FP224X is displayed (set), the sensor setup is not necessary. Go to 6.
When other than the FP224X is displayed (set), use the following procedure to set the sensor.
Use ![]() or
or ![]() and select
and select
![]()
then push ![]() ,
and the following detector
,
and the following detector
selection list appears.
4. The following detector selection list appears.
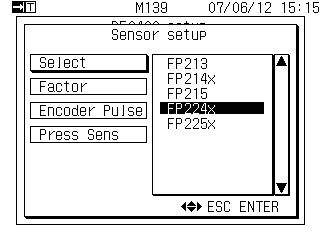
5. Specify the detector model to use.
(When the FP-2240HA is used as a detector)
Use ![]() or
or ![]() and select FP224X,
then push
and select FP224X,
then push ![]() .
.
The selection is established.
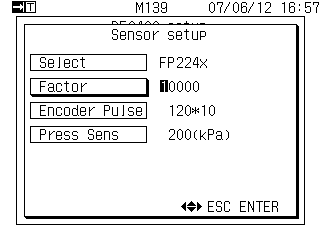
6. Set the factor value
Use ![]() or
or ![]() and select
and select
![]() ,
,
then push ![]() .
.
The leftmost figure of the factor value is highlighted.
>> Set the factor value written in the nameplate of detector or in the test certificate.
When you push ![]() or
or ![]() ,
the highlighted position moves.
,
the highlighted position moves.
When you push ![]() or
or ![]() ,
the highlighted numerical value increases or
decreases.
,
the highlighted numerical value increases or
decreases.
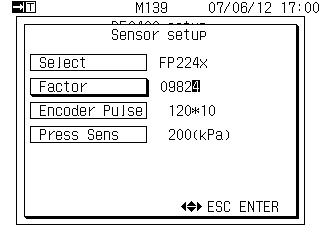
【Example of 4-digit factor value】
When the factor value is 4-digit number, set
the leftmost figure as 0: 09824 (setting
example)
7. Establish the factor value
8. Set the encoder pulse
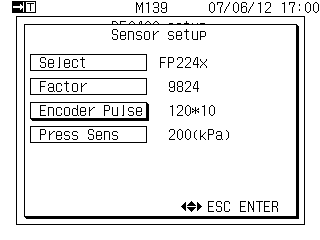
If encoder pulse is displayed (set) 120*10 → Go to 10.
If it is set (displayed) other than 120*10, or if you would like to set "120", set as follows.
Use ![]() or
or ![]() and select
and select
![]()
Push ![]() ,
then selection list of the number of pulses
appears.
,
then selection list of the number of pulses
appears.
9. Select the target encoder pulse from the selection list.
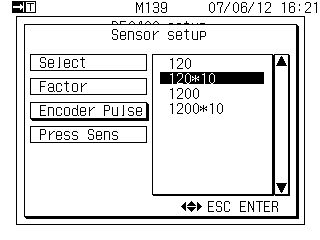
Use ![]() or
or ![]() and select 120 * 10.
and select 120 * 10.
Push ![]() ,
then selected encoder pulse is established.
,
then selected encoder pulse is established.
When you select 120*10, decimal places of the displayed value will be two ( 0.00 ). * When you want to reduce a digit of the decimal point, select 120.
Information
Instantaneous flow rate, sectional total average flow rate:
Display unit : kg/h, L/h
Number of display digits : Max. 7 (Decimal place depends on the flow rate.)
| Flow detector | Display range |
|---|---|
| FP-2140H/2240HA | 0.00 to 9999999 |
Sectional total flow rate, total flow rate:
Display unit : g, mL
Number of display digits : Max. 7
| Flow detector | Display range |
|---|---|
| FP-2140H/2240HA | 0.00 to 9999999 |
However, when the encoder pulse is set as follows,
| Encoder pulse setting | Display range |
|---|---|
| 120 P/R × 10 | 0.00 to 9999999 |
| 120 P/R | 0.0 to 9999999 |
10. Set Pressure sensor
Use ![]() or
or ![]() and select
and select ![]() .
.
Push ![]() ,
then selection list of the constant pressure is
displayed.
,
then selection list of the constant pressure is
displayed.
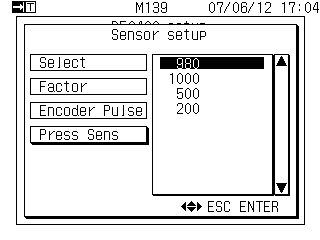
Use ![]() or
or ![]() and select 980.
and select 980.
Push ![]() ,
then the constant pressure is established.
,
then the constant pressure is established.
Revised:2007.06.18
