
![]()
![]()
![]()


(1) Explanation of the display (LCD display)
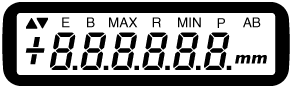
mm:
Indicates the measurement value is mm units. This unit
sign is not displayed during the preset setup procedure.
MAX:
(maximum)
Indicates maximum display value of the MAX measurement
mode. The displayed number will not change unless the measurement
input value exceeds it.
MIN: (minimum)
Indicates minimum display value of the MIN measurement
mode. The displayed number will not change unless the measurement
input value drops off it.
R: (range)
Indicates range (between maximum and minimum values) display of the
MAX/MIN measurement mode.
P: (preset)
Indicates the preset measurement function. Measurement
will start at the preset value. A flushing "P" indicates that the
preset setup procedure is in progress.
AB: (absolute)
Indicates the absolute measurement function. This
function selects the zero point as the measurement value when the
power is switched on.
B: (battery)
Indicates when the battery voltage becomes equal or less than
initial value. When the "B" appears in the display, it is time to
recharge the battery or switch to using an AC adapter.
(Recharging method)
E: (error)
Indicates the error display. The error indicates when there is no
reliability for the measurement value, and the spindle is moved
faster than the maximum spindle velocity. When the "E" appears in
the display, press the power switch off and start the measurement
again.
▲:
Indicates the direction. The measurement value moves to the plus
direction (increment counting) when the spindle is pushed in. If the
movement is opposite from above direction, the measurement value
moves to the minus direction (decrement counting).
▼:
Indicates the direction. The measurement value moves to the minus
direction (decrement counting) when the spindle is pushed in. If the
movement is opposite from above direction, the measurement value
moves to the plus direction (increment counting). +/-: Indicates the
polarity of + (plus) or - (minus) of the measurement value. No sign
is indicated when the measurement value is zero
(2) Explanation of the switch functions
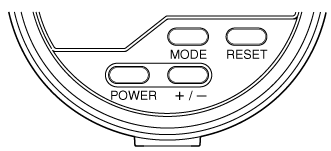
POWER: (power switch)
Switches the power ON and OFF.
+/-: (direction switch)
Selects the direction of the counting (increment or decrement). It
is related to ▲ ▼ display.
MODE: (mode switch)
Selects the MAX/MIN measurement mode. This switch can be used to
change the measurement function as well.
RESET: (reset switch)
Resets the display value to zero. This switch can be used for the
measurement function as well.
(3) Switch operation
The MODE switch and the RESET switch have two operation methods to change the functions. To change the measurement function, press and hold for around two seconds.
The following diagram is the list of the operations.
○: Press the switch briefly and release.
Press the switch for a very short term like touching it.
●: Press the switch and hold for around two
seconds.
Press the switch and hold for a while around two seconds. When
the display is changed, it is time to release the switch.
| Function\Switch | POWER | RESET | MODE | +/− |
|---|---|---|---|---|
| Normal measurement | ○Turn on/off the power
(reset the E error). |
○ Zero reset
Reset the maximum, minimum and range measurement. ● Go to AB measurement. |
○ Change to the maximum,
minimum and range measurement mode.
● Go to P measurement. |
○ Change the increment direction (invalid during maximum, minimum and range measurement). |
| Absolute measurement
AB |
○ Turn off the power (reset the absolute zero point). | ○ Reset to the preset value.
Reset the maximum, minimum and range measurement. ● Return to the normal measurement. |
− |
− (Increment direction is fixed at ▲.) |
| Preset measurement
P |
○ Turn off the power. | ○ Reset to the preset value.
Reset the maximum, minimum and range measurement. ● Go to normal measurement. |
○ Change to the maximum, minimum and
range measurement mode.
● Go to P setting. |
− |
Preset value setting \|/ |
○ Turn off the power. |
○ Leave P setting and return to P measurement. | ○ Select the setup displayed digit value.
● Set the displayed digit value and shifting digit. After above setting go to P measurement. |
− |
Additional explanation figure

Revised:2009/03/16
